The first thing I did wrong on my first serious remote work trip was connect my laptop directly to the hotel WiFi in Bangkok. The second thing I did wrong was charge my phone at a USB port in Suvarnabhumi airport. The third was pack four separate chargers for four devices, wonder why my bag was heavy, and then watch three of them fail over six weeks because cheap silicon chargers in tropical heat are not reliable.
None of these mistakes were catastrophic. All of them were avoidable with information I simply didn’t have. The travel tech hacks that actually matter aren’t complicated — they’re just things experienced nomads know and first-timers discover the hard way. This guide skips the discovery phase.
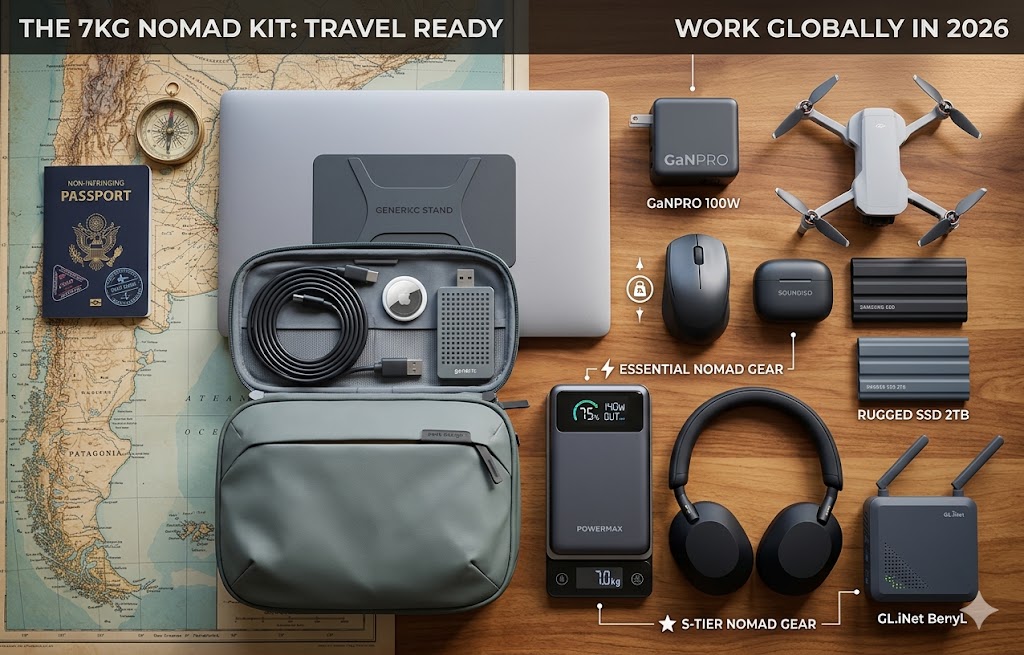
These are organised by the problem they solve. Every product recommendation is verified and linked directly. Every hack is something I’ve tested personally — not something that sounded plausible when I wrote it.
Hack 1: Stop Connecting Your Devices Directly to Hotel WiFi
Hotel WiFi is an open broadcast network. Every device on it can see every other device. Your laptop, your phone, your client data, your passwords — visible to anyone with basic network tools and five minutes of intention. I had a credential harvesting attempt at a hostel in Eastern Europe. I now travel with a router. I haven’t had another incident since.
The fix: connect a travel router to the hotel’s network once, and every device you own communicates through your own encrypted private bubble. The hotel sees one device. You get a secure, private network for everything.
The premium option is the GL.iNet GL-AXT1800 Slate AX — WiFi 6, WireGuard VPN that maintains full speed while encrypted, and built-in ad blocking across all connected devices. This is the router for anyone handling sensitive client data remotely.
The budget option is the GL.iNet GL-SFT1200 — 72g, USB-powered from a power bank, setup in four minutes. Primarily useful for bypassing hotel device limits and getting a basic private network without the full security suite.
The full technical comparison of both routers — including WireGuard vs OpenVPN throughput — is in the best travel router guide.
👉 GL.iNet Slate AX on Amazon.ca | GL.iNet GL-SFT1200 on Amazon.ca
Hack 2: Replace All Your Chargers With One GaN Block
The white plastic brick that came with your laptop weighs more than it should, generates more heat than it needs to, and charges one device. That’s three problems a GaN charger solves in a single purchase.
GaN (Gallium Nitride) transistors switch at higher frequencies than silicon, generating less heat at equivalent wattage. Less heat means smaller components, which means a 100W charger that weighs 195g instead of the 350–450g that a comparable silicon charger would require.
The practical hack: one GaN charger with three ports replaces your laptop charger, your phone charger, and your earbuds charger. One outlet. One cable to the wall. Everything charges simultaneously.
For MacBook Pro and high-draw laptop users: the Anker Prime 100W GaN with ActiveShield 2.0 thermal monitoring is the charger that doesn’t throttle in hot environments. Three ports, 100W primary USB-C, dynamic distribution.
For MacBook Air and ultrabook users: the Anker 735 GaNPrime 65W at 110g covers full-speed charging for any thin-and-light laptop. The lightest capable GaN charger available for the wattage level.
The full GaN charger comparison across four options is in the best GaN charger guide.
👉 Anker Prime 100W on Amazon.ca | Anker 735 65W on Amazon.ca
Hack 3: Use a 100W-Rated Cable — Not Whatever Came in the Box
This is the most overlooked component in every travel power setup. A budget USB-C cable looks identical to a 100W-rated cable. They perform completely differently.
Cheap USB-C cables use thinner internal wiring that caps actual power delivery at 60W regardless of what your charger is capable of. If you’re running a 100W charger and a cheap cable, you’re paying for 100W and receiving 60W. You’d never know unless you tested it.
The Anker 100W USB-C Cable is rated for full 100W throughput — the same wattage your charger is designed to deliver. I carry two. One stays in the bag permanently. The other is the one I actually use. When one fails — and cables do fail — the permanent one covers the gap without a trip to a shop.
👉 Anker 100W USB-C Cable on Amazon.ca
Hack 4: Tag Everything Before You Leave. Not After You Lose It.
The AirTag setup that recovered my friend’s tech pouch from the Madrid metro took 90 seconds from discovery to recovery. The setup that would have let her do it — attaching the AirTag to the pouch — took about 30 seconds before she left home.
The mistake most people make is treating trackers as recovery tools you add after a loss. They’re prevention infrastructure you install before a trip. One AirTag in your laptop bag. One in your checked luggage when you check bags. One on your keychain. One in your tech pouch. The Apple AirTag 4-Pack is the correct way to buy them — the per-unit price is significantly lower than individual packs.
The stealth placement hack: don’t attach AirTags to visible external keychain points where they can be found and removed. Tape one to the interior frame of a checked suitcase through the interior zipper pocket. Slide one into a dedicated sleeve in the bottom of a daypack. The tracker works through any material — location is reported silently by any iPhone within Bluetooth range.
The full tracker comparison including Samsung SmartTag2 and Tile alternatives is in the best gear tracker for camping guide — the tracking principles apply equally to urban travel.
👉 Apple AirTag 4-Pack on Amazon.ca
Hack 5: Connect Your Wireless Headphones to the Seatback Screen
Every seatback entertainment system uses a 3.5mm wired audio jack. Your AirPods, your Sony XM5s, your Bose QuietComfort — none of them have a 3.5mm plug. The airline’s solution is wired earbuds that sound like listening through a wall.
The Twelve South AirFly Pro is a Bluetooth transmitter the size of a large USB drive. It plugs into the armrest’s 3.5mm jack and pairs with your wireless headphones, transmitting the in-flight entertainment audio at AptX Low Latency — a codec specifically designed to prevent the audio-video sync delay that makes dialogue misalign with lip movements.
I carry this on every flight. It weighs 10 grams. It transforms a seatback entertainment system from something you tolerate into something you actually enjoy using. When the seatback screen is broken — which happens more than airlines would like to admit — it does nothing. But when it’s working, it changes the entire cabin audio experience.
👉 Twelve South AirFly Pro on Amazon.ca
Hack 6: Never Use a Public USB Port Without a Data Blocker
Airport USB charging ports, hotel charging stations, and café USB hubs are all potential vectors for “juice jacking” — a technique where malicious hardware on the public USB port uses the data pins alongside the power pins to install malware or harvest data from connected devices. It’s rare but documented, and entirely preventable.
The hardware fix is a USB data blocker — a tiny adapter that physically disconnects the data pins from the USB connection while allowing the power pins to function normally. You plug the blocker into the public port, plug your cable into the blocker, and charge safely. No data path exists between the port and your device.
USB data blockers are widely available for under $10 and weigh around 5g. They’re not in the verified database but they’re worth mentioning specifically because the juice jacking risk at airports is real and the fix costs less than a coffee. Search “USB data blocker” on Amazon.ca and buy any well-reviewed option — the product is simple enough that brand doesn’t matter significantly.
The alternative that removes the public port dependency entirely: the INIU 10,000mAh Slim as a personal power bank. At 204g and two and a half iPhone charges, it covers most transit days without ever needing a public USB port.
👉 INIU 10,000mAh Slim on Amazon.ca
Hack 7: Back Up Every Evening — And Use a Drive That Survives the Trip
Data loss on the road follows a predictable pattern. It doesn’t happen dramatically. It happens quietly — a drive that got wet in a humid climate and corroded over six weeks, a laptop that got stolen in transit, an SSD that took a knock from a fall in a bag. By the time you notice, the data is gone.
The backup habit is simple: every evening, transfer the day’s work to an external SSD. The habit takes 90 seconds with a fast drive. The protection it creates is complete.
The drive matters as much as the habit. A standard portable SSD in Southeast Asia’s humidity and heat is a slow-motion data risk. The Samsung T9 Portable SSD at IP65 and 2,000 MB/s is sealed against dust and water jets and fast enough that the backup habit never feels like a chore — the transfer takes seconds, not minutes.
For lighter workflows — photography, documents, standard business files — the SanDisk 1TB Extreme at IP55 and 49g is the right-sized alternative. Lighter, cheaper, adequate for standard travel environments.
The full rugged SSD comparison including humidity performance data is in the rugged SSD for travel guide.
👉 Samsung T9 SSD on Amazon.ca | SanDisk 1TB Extreme on Amazon.ca
Hack 8: Use One Universal Adapter Instead of Country-Specific Sets
The pile of country-specific plug adapters that accumulates over a multi-country trip is a real packing problem. UK to EU to US to Australia across one long trip means four separate adapters, each adding 50–80g to the kit, each adding an item to track and pack.
The EPICKA Universal Travel Adapter covers 150+ countries with one device and adds four USB ports alongside the physical plug adapter. One item. One purchase. Every destination covered. At approximately 125g it’s not the lightest option but it’s the one that eliminates the adapter accumulation problem entirely.
The practical packing placement: the EPICKA lives in the tech pouch permanently. It never comes out to be repacked or left behind — it’s always there when you need it.
👉 EPICKA Universal Adapter on Amazon.ca
Hack 9: Organise Your Cables Once — Stop Doing It Every Day
The morning ritual of hunting for the right cable at the bottom of a bag is a solved problem that most nomads continue experiencing because they haven’t implemented the solution. An organised tech pouch where every cable and adapter has a dedicated slot eliminates this friction entirely.
The setup takes ten minutes once. After that, every cable is visible, every adapter is accessible, and setup at a new location takes under 60 seconds rather than the fumbling search that an unorganised pouch requires.
Premium option: the Peak Design Tech Pouch — weatherproof, expandable, origami-style internal layout that provides dedicated slots for every cable, adapter, and drive. Built to last years of daily travel use.
Budget option: the Bagsmart Electronic Organizer — flat pouch with elastic loops and mesh pockets, opens fully for instant visual access to everything inside. Under $40. Setup in ten minutes. The problem is solved at a fraction of the Peak Design price.
👉 Peak Design Tech Pouch on Amazon.ca | Bagsmart Electronic Organizer on Amazon.ca
Hack 10: Use Grayscale Mode When Your Battery Is Critically Low
This one costs nothing and works immediately. On OLED screens — which is every modern iPhone, most Samsung Galaxy phones, and many premium laptops — individual pixels generate their own light and turn completely off when displaying black. A screen in grayscale mode displays everything in shades of grey, meaning the vast majority of screen content draws significantly less power than a full-colour display.
The activation process: on iPhone, go to Settings → Accessibility → Display & Text Size → Colour Filters → Greyscale. On Android: Settings → Accessibility → Colour and Motion → Greyscale. On both platforms this is also accessible through the accessibility shortcut — set it up before you need it so you can activate it with three button presses when the battery hits 15%.
Combined with turning off Background App Refresh (Settings → General → Background App Refresh → Off), this extends a critically low OLED battery by 20–40% in real-world use — the difference between making it to a charger and not.
Hack 11: Use an eSIM Instead of Hunting for Local SIMs at Every Border
Physical SIM swapping at every country border is the connectivity tax most nomads pay without thinking about it. Finding a local SIM shop, negotiating a data plan, physically switching SIMs and hoping the old one doesn’t get damaged — it’s a 30–90 minute process in every new country.
eSIM eliminates this entirely. Services like Airalo, Holafly, and Google Fi let you purchase and activate local data plans from your phone before you land — no physical SIM, no shop, no language barrier. The eSIM downloads over WiFi and activates automatically when you arrive in the new country.
The practical limitation: eSIM requires a compatible device. Every iPhone from XS onwards supports eSIM. Most current Android flagships support it. Older devices don’t. Check your device’s eSIM compatibility before the trip.
Airalo specifically is worth mentioning because it offers regional plans that cover multiple countries simultaneously — a single plan covers Southeast Asia or Europe without switching between country-specific plans at each border.
Hack 12: Sleep on Long Flights With a Support System That Actually Works
Standard U-shaped neck pillows address neck pain from the wrong direction. They support underneath the neck but don’t prevent the head from falling forward — the actual mechanism that causes the cervical spine loading that wakes you up sore after a long flight.
The Trtl Travel Pillow uses a rigid internal support frame wrapped in fleece that props your head from the side rather than underneath — preventing the forward fall that standard pillows don’t address. It packs completely flat, wraps around a carry-on handle, and weighs 148g. For window seat sleepers specifically, it’s the only neck support I’ve found that provides enough lateral support to keep the head in a neutral position through a full sleep cycle.
It doesn’t work for every sleeper — middle and aisle seats make the support angle harder to achieve. But for the window seat overnight flight, it’s the product that changed the sleep-on-planes experience from “survive it” to “actually do it.”
👉 Trtl Travel Pillow on Amazon.ca
Hack 13: Move Your Heaviest Items to Your Personal Item
Most budget airlines weigh carry-on bags at the gate. Personal items — the smaller bag that goes under the seat — are rarely weighed and almost never checked with a scale. The hack is legal and widely used: move the heaviest items in your kit (laptop, power bank, charger) from the checked bag or main carry-on into the personal item before the weight check.
A laptop at 1.24kg, a power bank at 204g, and a charger at 110g is 1.55kg of gear that moves from one bag to another in two minutes and takes your carry-on from overweight to compliant. The personal item goes under the seat. The carry-on goes in the overhead bin. The gate agent checks the carry-on weight. The heavy items aren’t in it.
This isn’t a guarantee — enforcement varies by airline and gate agent. But it’s standard practice among frequent budget airline travelers and works consistently when the personal item genuinely fits under the seat.
Hack 14: Learn the Phonetic Alphabet for WiFi Passwords
This sounds trivial until you’ve spent three minutes at a café counter while someone reads a 20-character WiFi password in a language you don’t speak, watching three letters get transposed because neither of you has a shared convention for distinguishing “B” from “P” or “M” from “N” verbally.
The NATO phonetic alphabet — Alpha, Bravo, Charlie, Delta, Echo, Foxtrot — is understood internationally in exactly this context. Asking “is that Foxtrot or Echo?” disambiguates immediately without requiring shared language beyond the letter names. Most café staff who give out WiFi passwords regularly will recognise what you’re doing.
Learn the full alphabet before your first trip. It’s 26 words and takes about 20 minutes. It will save you cumulative hours of password frustration across a year of nomadic travel.
The Complete Travel Tech Hack Kit — Quick Reference
All verified product links in one place:
| Hack | Product | |
|---|---|---|
| Hotel WiFi security (premium) | GL.iNet Slate AX | View on Amazon.ca |
| Hotel WiFi security (budget) | GL.iNet GL-SFT1200 | View on Amazon.ca |
| GaN charger (multi-device) | Anker Prime 100W | View on Amazon.ca |
| GaN charger (ultralight) | Anker 735 65W | View on Amazon.ca |
| Cable (100W rated) | Anker 100W USB-C Cable | View on Amazon.ca |
| Gear tracking | Apple AirTag 4-Pack | View on Amazon.ca |
| In-flight audio | Twelve South AirFly Pro | View on Amazon.ca |
| Transit power | INIU 10,000mAh Slim | View on Amazon.ca |
| Data backup (premium) | Samsung T9 SSD | View on Amazon.ca |
| Data backup (lightweight) | SanDisk 1TB Extreme | View on Amazon.ca |
| Universal adapter | EPICKA Universal Adapter | View on Amazon.ca |
| Organisation (premium) | Peak Design Tech Pouch | View on Amazon.ca |
| Organisation (budget) | Bagsmart Electronic Organizer | View on Amazon.ca |
| Flight sleep | Trtl Travel Pillow | View on Amazon.ca |
None of these are here because of a paid placement. All of them are in my bag or have been tested on real trips. The hacks that don’t require a product purchase — grayscale mode, eSIM, personal item weight shifting, phonetic alphabet — are equally real and equally tested.
All products above ship to Canada with Prime. If you implement three of these hacks before your next trip, the trip will go measurably better than the last one.
Every hack in this guide points toward a deeper product decision that a dedicated guide covers properly. For the full router comparison that underpins Hack 1, the best travel router guide covers the technical depth. For the complete GaN charger breakdown across four options with honest wattage matching, the best GaN charger guide is the reference. And for the complete system that all these hacks support, the best tech travel kit guide maps every category from laptop to storage.